|
In this tutorial we will create animation loops in Maya that run continuously for Unity.
In Unity:
Prebuilt SteamVR Project with Universal Rendering Pipeline
Download this 2021 scene, move the folder to your Desktop or working area.
This file is already setup with SteamVR and some other tools.
https://classes.dma.ucla.edu/Fall22/156/projects/URPtemplate.zip
PC: Right mouse over folder select Extract All...
Rename the template folder. Place it in a new location.
Start the Unity Hub
Select ADD
Locate your renamed project folder
Click on the project to start
Mac Only:
Mac error: Answer SwitchTarget
:::::::::::::::::::::::::::::::::::::::::::::::::::::::::::::::::::::::::::::::::::::::::::::::::::::::::::::::::::
FIX Maya file type issue on school PCs
If you do not see an icon then your Maya files lost their file type association. 
Alan and Jonathan fixed it!
This is how you can fix it for your school computer:
Select a Maya file.
Right mouse key select Open with->Choose another App
Select Always use this app to open .mb files (most important)
Click the blue More Apps arrow
Scroll down and choose Look for another app from this PC
Select This PC or the name of your PC
Open the Local Disk (C:) (this may be named after your computer at school)
Open Program Files
Open Autodesk
Open Maya2023
Open bin
Select maya.exe
:::::::::::::::::::::::::::::::::::::::::::::::::::::::::::::::::::::::::::::::::::::::::::::::::::::::::::::::::::
In Maya:
Model a simple room with some animated objects, no floor. You can make the floor in Unity.
Model a Room
Use 1 grid unit as 1 foot for scale.
Create poly models for the items in your VR environment. (NURBS do not work)
Shaders and Textures
Use a Lambert or Phong Shader, other shaders will be ignored by Unity.
If you have any image texture maps place them in your Unity project-> Assets folder
You may assign any textures with Maya, using the images located inside your Unity project->Assets folder.
Save
Save the Maya room file to your Unity project-> Assets folder
Any changes you make to your Maya model will automatically update in Unity because the Maya file resides in your Unity project. (You may want to save a backup of this model outside of Unity from time to time.)
In Unity:
Initial Model setup
Select the Maya file in the Assets list
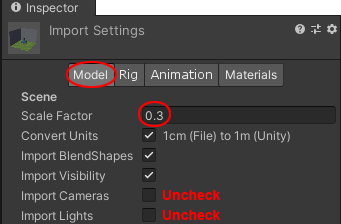
Select the Model tab in the Inspector
Change the Scale Factor to .3
Uncheck Import Cameras
Uncheck Import Lights
(Very important for VR, Maya camera interferes with the VR Player camera.)
Click Apply
Add the Maya file to your scene
Drag the Maya model from Assets up to the Hierarchy
Add a Mesh Collider to the Maya Model
Select the Maya model in the Hierarchy
Select Add Component in the Inspector (Clear out any prior component searches, if any.)
Select Physics->Mesh Collider
(It is best to use primitive shape colliders when possible.)
In Maya:
Animation, Looped Rotation Example
It can be cleaner to keep animation models in separate scene files.
Move the time slider over to frame 1 at the bottom of the screen.

Change 24 fps to 30 fps over to the right on the time slider.

Select a poly object.
Use the channel box on the right side of the screen.
If you do not see the channel box, hit the  button upper right side of the screen. button upper right side of the screen.
Highlight Rotate Y in the Channel Box
Use the right mouse key to bring up mini menu, choose Key Selected.
Change the End Time of the animation to 301

Move the time slider over to frame 301.
Rotate the object 360 degrees in the Y axis
Highlight Rotate Y in the Channel Box
Use the right mouse key choose Key Selected.
Use this process for any channel that can be animated.
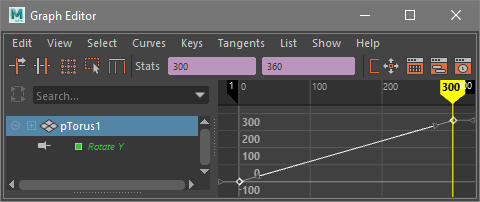
Change the End Time of the animation to 300
The loop will perfect playing between 1 and 300.
Unity looks at the length of the animation from the time slider to determine length.
Graph Editor
Select you object
Select Windows->Animation Editors->Graph Editor
Select the animation curve
Select Tangents->Linear this will make the timing a constant speed.

Preview the animation
Move the time slider over to frame 1 at the bottom of the screen.
Right mouse over the time slider to bring up the mini-menu
select Playback Speed->Real-time
Hit the play arrow on the time slider. 
Stop the playback by clicking the mouse on the red square over the play arrow.
Save Maya File to Unity Assets
Save the Maya scene file into your Unity project->Assets folder
You will see your models and textures appear automatically in Unity.
(Maya has a bad utility to export files to a Unity project, it saves as an FBX, the scale is completely wrong. Do not use. Unity already imports Maya format files very nicely.)
:::::::::::::::::::::::::::::::::::::::::::::::::::::::::::::::::::::::::::::::::::::::::::::::::::::::::::::::::::
View your Maya Animation in Unity
In Unity:
Adjust Maya file:
Select the Maya file in the Assets list
Select the Model section in the Inspector tab
Change the Scale Factor to .3
Uncheck Import Cameras and Lights
(Very important for VR, Maya camera interferes with VR camera.)
Hit Apply

Switch to Legacy Animation
Select your Maya Model in the Assets area
Switch to the Rig tab in the Inspector on the right.
Change Animation Type to Legacy (default was Generic)
Hit Apply
Loop
If you would like to loop your animation:
Select the object that has the animation from the Assets window
Change to the Animation section of the Inspector tab
Change Wrap Mode to Loop (near top)
Change Wrap Mode located beneath Take 001 to Loop too
Hit Apply
Now your animations are all set up to run continuously.
Move the Animation into the Hierarchy
Drag your Maya file in to the Hierarchy tab.
:::::::::::::::::::::::::::::::::::::::::::::::::::::::::::::::::::::::::::::::::::::::::::::::::::::::::::::::::::::::
Try Running your Project
Always Save your scene before playing.
Hit the Play button 
If you are running in Sim mode use wasd,qr or the arrow buttons to navigate around the scene,
:::::::::::::::::::::::::::::::::::::::::::::::::::::::::::::::::::::::::::::::::::::::::::::::::::::::::::::::::::
View Your Project in VR
Publish to WebGL
You may view your project in a browser on a computer or your phone.
:::::::::::::::::::::::::::::::::::::::::::::::::::::::::::::::::::::::::::::::::::::::::::::::::::::::::::::::::::
EXAMPLES
https://classes.dma.ucla.edu/Fall20/156-1/projects/examples/B_Maya_anim1_player
https://classes.dma.ucla.edu/Fall20/156-1/projects/examples/C_activate_animation_player
https://classes.dma.ucla.edu/Fall20/156-1/projects/examples/table_lamp_player
:::::::::::::::::::::::::::::::::::::::::::::::::::::::::::::::::::::::::::::::::::::::::::::::::::::::::::::::::
**IMPORTANT Save a spare copy of your Maya scene files and Textures in another folder away from your Unity project.
:::::::::::::::::::::::::::::::::::::::::::::::::::::::::::::::::::::::::::::::::::::::::::::::::::::::::::::::::::::::
OBS
OBS screen capture VR documentation
:::::::::::::::::::::::::::::::::::::::::::::::::::::::::::::::::::::::::::::::::::::::::::::::::::::::::::::::::::::::

|