|
In Unity:
Prebuilt SteamVR Project with Universal Rendering Pipeline
Download this 2021 scene, move the folder to your Desktop or working area.
This file is already setup with SteamVR and some other tools.
https://classes.dma.ucla.edu/Fall22/156/projects/URPtemplate.zip
PC: Right mouse over folder select Extract All...
Rename the template folder. Place it in a new location.
Start the Unity Hub
Select ADD
Locate your renamed project folder
Click on the project to start
Mac Only:
Mac error: Answer SwitchTarget
:::::::::::::::::::::::::::::::::::::::::::::::::::::::::::::::::::::::::::::::::::::::::::::::::::::::::::::::::::
Interact to activate a Maya Animation
In Maya:
Model an animated poly object.
Unity will accept, animation channels from: move, rotate, scale, blend shapes and IK joints.
Save the Maya scene file into your Unity project->Assets
In Unity:
Select the Maya file in the Assets list
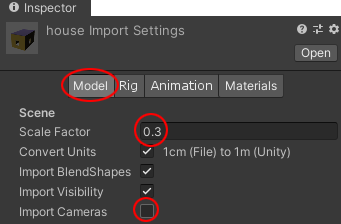
Select the Model section in the Inspector tab
Change the Scale Factor to .3
Uncheck Import Cameras and Lights
(Very important for VR, Maya camera interferes with VR camera.)

Switch to the Rig tab in the Inspector on the right.
Change Animation Type to Legacy (default was Generic)
Hit Apply
Switch to the Animation tab
Rename Take 001 to a unique name
Hit Apply
Add your Maya File to your scene
Drag your Maya model from the Assets list over to the Hierarchy tab.
Add Interaction to the Model
Select the Maya Model in the Hierarchy, work with the top level that has an animation channel.
Under Animation, turn off Play Automatically
Add Component->Physics->Collider
Choose the closest shape.
You may need to Edit Collider the shape from Edit Collider in the Inspector, because of the animation or its grouping.
Use Add Component
Search for inter
Select Interactable Hover Events
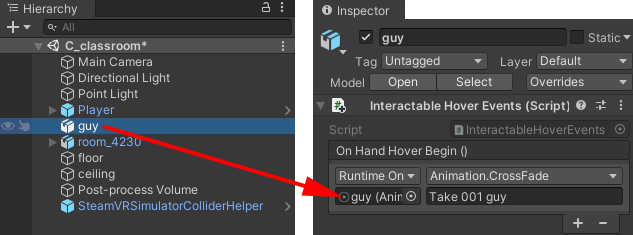
Hit the + under On Hand Hover Begin () in the Inspector
Drag and drop Maya Model from the Hierarchy onto None (obj) in the Inspector
Click the drop down menu reading No function and choose Animation->CrossFade
Type Take 001 (use the new unique name) in the empty box below
Under Interactable Script in the Inspector
Turn off Highlight on Hover

Save your scene.
You can now test your scene by selecting the Play arrow. Your animated object will start its animation when you touch the object or grab it with a VR trigger.

:::::::::::::::::::::::::::::::::::::::::::::::::::::::::::::::::::::::::::::::::::::::::::::::::::::::::::::::::::
EXAMPLE
http://classes.dma.ucla.edu/Fall20/156-1/projects/examples/C_activate_animation_player
:::::::::::::::::::::::::::::::::::::::::::::::::::::::::::::::::::::::::::::::::::::::::::::::::::::::::::::::::::
OBS
OBS screen capture VR documentation
:::::::::::::::::::::::::::::::::::::::::::::::::::::::::::::::::::::::::::::::::::::::::::::::::::::::::::::::::::
**IMPORTANT Save a spare copy of your Maya scene files and Textures in another folder away from your Unity project.
:::::::::::::::::::::::::::::::::::::::::::::::::::::::::::::::::::::::::::::::::::::::::::::::::::::::::::::::::::
Publish to WebGL
You may view your project on a website server and access via the internet
:::::::::::::::::::::::::::::::::::::::::::::::::::::::::::::::::::::::::::::::::::::::::::::::::::::::::::::::::::
Teleporting
You need a VR headset and controllers for this to work. Do NOT use for webGL.
Teleporting can not be experienced with the simulator and it gets in the way for WebGL publishing.
Drag in the Teleporting prefab from SteamVR->InteractionSystem->Teleport->Prefabs->Teleporting into the Hierarchy tab.
Create a floor, GameObject->3D Object->Cube.
Make a Plane for the teleport area. GameObject->3D Object->Plane It should be located above your cube
Add the Teleport Area component to the plane
Select the plane, use Add Component
search for tele select Teleport Area
This will allow the player to teleport anywhere along this plane.
Save your scene.
If you have a VR headset, you can now test your scene by selecting the Play arrow. 

|