|
Fluids have been with Maya for many years, there is a newer utility called Bifrost. You may want to compare. I found Bifrost was not able to create a certain fire effect I was after.
Set up your Maya options for animation
Move the time slider over to frame 0 at the bottom of the screen.

Change 24 fps to 30 fps over to the right on the time slider.

Lights
Add Lights to the scene. These will illuminate the smoke etc.
Basic Fire Tutorial

Use the FX Module
Fluids->3D Container->
Uncheck Add Emitter:
Select the fluid object
Attribute Editor
Container Properties
Select Keep Voxels Square
Base Resolution 40 (default 10, higher for more detail and slower render)
Size 5 15 5
Boundary Y -Y side
Emitter Object
Add an object or more to the scene to emit fluids, place within the container.
Select the fluid, shift select emitter object(s)
Fluids->Add/Edit Contents->Emit from Object
Select the emitter, tab in the fluid or grouped under emitter object
Basic Emitter Attributes
Emitter rate 100 (default 100)
Select Use Distance (default not checked)
Max Distance 3
Fluid Attributes
Density/Voxel/Sec 1 (play with this, default 1)
Heat/Voxel/Sec 2 (default 1)
Fuel/Voxel/Sec 4 (1, default 1)
Fluid Dropoff 2 (0, default 2)
Keep Jitter checked (maybe no difference)
Fluid Emission Turbulence
Turbulence 1.2 (1, default 0)
Fluid Container Settings
Select the fluid
Contents Method
Temperature Dynamic Grid (default Off(zero))
Fuel Dynamic Grid (default Off(zero))
Falloff Method Static Grid
Dynamic Simulation
High Detail Solve All Grids Except Velocity
Content Details
Density
Dissipation .2 (default 0) dies off faster
Noise .5 (default 0)
Velocity
Swirl 10 (default 0)
Noise .1 (can be higher, default 0)
Turbulence
Strength .01 (default 0)
Temperature
Temperature Scale 1 (default 1)
Buoyancy 9 (default 3)
Dissipation .1 (default .1)
Turbulence .1 (2, default .1)
Noise 0 (1, default 0)
Fluid Shader Settings
You do not need to re-run the simulation for color changes.
Select the fluid
Shading
Transparency .2 (color value, default .25)
Dropoff Shape Cube (default Cube)
Edge Drop Off .1 (This effects the height, default .05)
Color
Selected Color .2 (default 1, white)
Incandescence
Make the value of orange 15 (push the color selector over limit, default .7)
Incandescence Input Density (default Temperature)
Input Bias .1 (-.088, try various numbers, default 0)
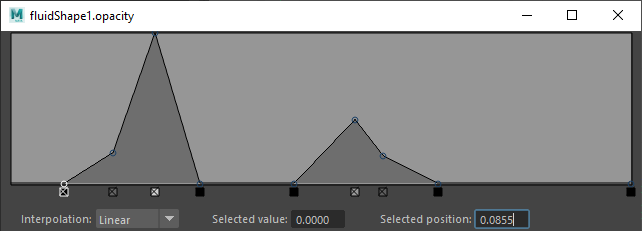
Opacity
Make the ramp spiky, try different patterns.
Play with the Input Bias try .3 (this can make a huge difference, default 0))

Shading Quality
Quality 1 (default 1)
Render Interpolator smooth (default linear)
Textures
Select Texture Opacity
Input Texture Scale Y 1.5 (default 1)
Arnold
Step Size .05 (default .1)
Enable Deformation Blur (This makes everything a little trippy if the flame is transparent. default not checked)
 Play the animation simulation to see changes you have made. Play the animation simulation to see changes you have made.
Cache the Simulation
This can create some huge files, caching allows you to look at any frame in the sequence or batch render on multiple computers.
Select the fluid
nCache->Create New Cache->Maya Fluid
Create a folder for cache, I make a folder in the scenes directory
If you would like this to cache faster:
Hide everything in the scene, except the fluid and emitters.
Select the fluid and change Display, Wireframe Display Off (default Particles)
Render Test Settings
Press Render Settings icon upper right or middle 
Under the Arnold Renderer tab:
Under the Sampling arrow:
Camera (AA) to 2 (a little grainy, default 3)
Diffuse to 0 (default 2)
Specular to 0 (default 2)
Transmission to 0 (default 2)
SSS to 0 (default 2)
Volume Indirect to 1 (default 2)
Under Filter arrow
Width to 1
Under the Ray Depth arrow
Total to 1 (default 10)
Diffuse to 1 (default 1)
Specular to 0 (default 1)
Transmisssion to 0 (default 8)
Volume to 1 (leaves specks, default 0)
Transparency Depth to 0 (default 10)
Batch Render
Open a text document with Notepad, type this:
@echo off
set render=C:\"Program Files"\Autodesk\Maya2023\bin\Render.exe
set directory=C:\Users\%USERNAME%\Documents\maya\projects\default\images\folder
set scene_folder=C:\Users\%USERNAME%\Documents\maya\projects\default\scenes
%render% -s 1 -e 100 -x 960 -y 540 -cam persp -rd %directory% -im image_name %scene_folder%\fluid_test4.mb
Save the file as this_batch.bat on your Desktop
Double click the batch file to run it.
Fluids Batch Render BUGs
The batch ignores the cached files and takes a lot of time to calculate a run-up for sequences if the entire animation is not cached starting from frame 0 - the end of the fluid effect, even if your fluid starts later. This is an unfortunate bug because cache files can be huge.
Another very important thing to do:
Select the fluid and then select the cache node in the Attribute editor
Change the Start Frame for the cache from 0 to 1
This way you will not see black frames at the start of a sequence.
In addition, the first frame of any sequence will also have no fluid rendered, unless you save your scene file with the time slider at 0.
This is the run-up error message:
Warning: line 1: This file contains an uncached fluid; rewind and playback to see correct current state.
If you have problems try:
nCache->Delete Cache-> (keep the cache files) (keep the cache files)
nCache->Attach Cache... select the same cache you just deleted
Deadline Render Server
It works out best to save the fluid cache files in the same folder as your scene.
Make sure to open the Maya scene file from the local folder and reconnect the cache.

|