|
Rotate Plane Solver IK Rig by Vinny Roca
Can be used for Arm or Leg
Draw the skeleton
In the Rigging Module:

Select Skeleton->Create Joints
In the top viewport, draw three draw joints with the middle joint pushed back slightly on the z axis. Use grid snap (x key) to snap them to the grid.
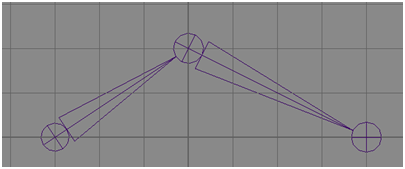
Create iK handle
Select Skeleton->Create IK handle->
1) Make sure "Current Solver" is set to Rotate-Plane Solver

2) Select the first and last joint on your chain to create the IK handle.
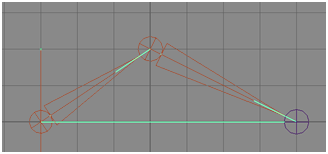
3) You can now click on the "ikHandle" in your outliner and move it around with the move tool (w key) to see the effects. Note that if you use the rotate tool the arm does not rotate.

Create Pole Vector
In order to rotate our arm we need to create a "pole vector" that will control the direction our elbow is facing.
Select Create->Locator
Using grid snap in the top viewport, move the locator a few spaces above your elbow joint.
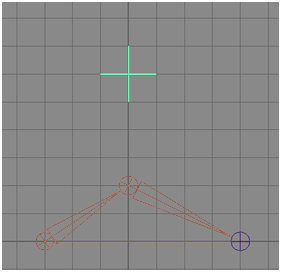
Select the new Locator then the iK handle (order is important)
Select Constrain -> Pole Vector
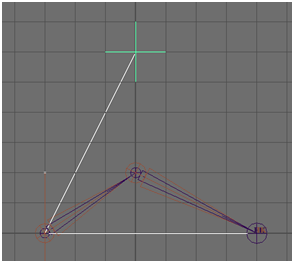
Your image should match the one below with the new line formed between the top joint and the locator. If you move the locator up and down you will see that it changes the rotation of the elbow.
Create Controls for Rig
Create the Hand/Arm controller
Select Create-> NURBS Primitives -> Circle
Select the circle
Select Channel box -> INPUTS -> makeNurbCircle
1) Change Normal Y to 0
2) Change Normal X to 1
Using the Move tool and Point Snapping (v key) move the circle to the last joint
Select Modify-> Freeze Transformations
Select the circle then select the last joint
Select Constrain->Orient
This will allow our hand to rotate using the circle.
In your outline drag your iK handle onto your nurbsCircle using the middle mouse to parent the ikHandle to the circle.
This will allow your circle to move the arm around.
Select all your objects, your arm should now look like the below image
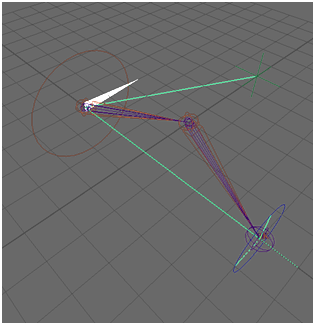
Connect the Pole Vector to the Elbow
Select the pole vector (locator)
Select Create->Annotation
Press Space the Enter
The Annotation creates another locator - select the new Locator in the outliner(above the annotation)
Go to Channel Box -> annotationLocatorShape
Set Local Scale to 0 on x y and z - this will hide the newly created locator
Select the elbow joint and then your annotation
Select Constrain -> Point
Your elbow is not visually connected to the pole vector so you can clearly see which direction your elbow is pointing.

Set up your Maya options for animation
Move the time slider over to frame 1 at the bottom of the screen.

Change 24 fps to 30 fps over to the right on the time slider.

Draw the skeleton
In the Rigging Module:

Select Skeleton->Create Joints
1 In the front view click the first joint for the hip
2 Click the hip bone straight across from the first point
3 Switch to the side view click a knee, ankle and toe.
The knee should have a bend, the ankle should be above the ground.
It is important to position the bend, so the bone knows what axis to hinge.
 
Press the up arrow on the keyboard three times until the entire leg (not hip) is highlighted.
Use Skeleton->Mirror Joints->
Choose YZ
Click Mirror
Use Skeleton->Create Joints for upper body: start by selecting hip joint.
6 In the side view draw the middle of the back bone with a slight bend.
7 In the side view draw the center of the shoulder blades.
8 Switch to the front view and draw the shoulder straight across from the last joint.
9 Switch to the side view and draw the elbow.
10 Draw the wrist.
Press the up arrow on the ke yboard twice until the entire arm is highlighted.
Use Skeleton->Mirror Joints
Press the up arrow on the keyboard once until the upper skeleton is highlighted.
11 In the side view draw the neck and then the head with a slight bend.
12 Hit Enter to stop the process.
Rotate the arms -90 in Y to make it easier to bind if you like.
You can adjust the position of the joints with the Move Tool, or the Pivot tool (d).
Select the entire skeleton from the hips and select Skeleton->Set Preferred Angle
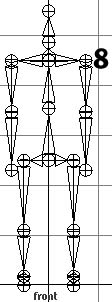 
Skin
Change the size of your joints to make skinning easier, Display->Animation->Joint Size
Select the surface to be used as skin and then shift to select the skeleton from the hips..
Choose Skin->Bind Skin->
Input Max Influences: 2
Look at Vertex Components
Select a Vertex
Open Windows->General Editors->Component Editor
Select the Smooth Skins tab
Notice the weighting for various points in relation to joints.
You can change them here, but you may prefer the Paint Weights Tool below.
Adjust the bind
Hit 5 for shaded mode.
Rotate the joint you would like to adjust.
You will want to name your joints.
Select the skin you would like to fix, choose Skin->Paint Skin Weights->
Adjust the size of the brush, under Stroke, Radius(U) try .5
Select the joint you would like to paint from the list
Adjust the Value to 0 to erase or zero out
Select vertices and use Windows->General Editors->Component Editor Smooth Skins tab to manually skin, the weights should add up to 1
You may also group objects into the skeleton if they do not bend.
Add handles to the legs and feet
Handles will not transfer to Unity, we will use them to animate.
Use Skeleton->Create IK Handle->
Choose Current solver: Single-Chain Solver
Click Close.
Click the right hip to start the handle
Click the right ankle to finish the first handle.
Do this again for the left leg. Use y to start the tool over again. (This is a shortcut to remember any last command.)
Click the right ankle to start the foot handle.
Click the right toe to finish the handle.
Do this again for the left foot. Use y to start the tool over again.
A little test
Select the entire body from the hip, this will select the top group in the hierarchy, move the body around, notice the feet follow. OK put the body back to 0.
Set Keyframe 1 for the handles
Set the playback end time on the time slider to 100.
Move the time slider over to frame 1 at the bottom of the screen.
Select the 4 handles, you may want to use Windows->General Editors->
Hypergraph: Hierarchy.
Highlight Translate X, Y, and Z in the channel box.
Use the right mouse key over the the channel names, choose Key Selected.
Another little test
Select the entire body from the hip only, Move the body around, notice the feet do not follow, they are stuck to the ground. Put the body back to 0.
Set Keyframe 1 for the body
Select the body or top node of the skeleton.
Highlight Translate X, Y, and Z and Rotate X, Y, and Z in the channel box.
Use the right mouse key over the the channel names, choose Key Selected.
Set Keyframe 30 for the body and handles, foot up
Move the time slider over to frame 30 at the bottom of the screen.
Select the body or top node of the skeleton.
Use the Move Tool to move the body forward in the Z axis being careful not to move the feet from the ground.
Use the Rotate Tool to tilt the body forward a bit in the X and Y axes.
Highlight Translate X, Y, and Z and Rotate X, Y, and Z in the channel box.
Use the right mouse key over the the channel names, choose Key Selected.
Select 2 of the handles for the right foot.
Use the Move Tool to position the leg and foot above the ground.
Select all 4 of the handles for both feet.
(You must set keyframes for both feet to avoid skating,)
Highlight Translate X, Y, and Z in the channel box.
Use the right mouse key over the the channel names, choose Key Selected.
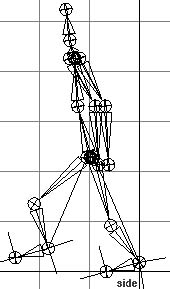 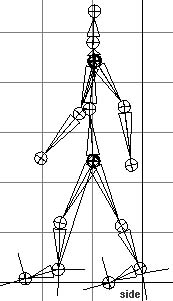
Keyframe 30 Keyframe 50
Set Keyframe 50 for the body and handles, foot down
Move the time slider over to frame 50 at the bottom of the screen.
Select the body or top node of the skeleton.
Use the Move Tool to move the body forward in the Z axiws a bit.
Use the Rotate Tool to un-tilt the body back a bit in the X and Y axes.
Highlight Translate X, Y, and Z and Rotate X, Y, and Z in the channel box.
Use the right mouse key over the the channel names, choose Key Selected.
Select 2 of the handles for the right foot.
Use the Move Tool to position the leg and foot back on the ground.
Select all 4 of the handles for both feet.
Highlight Translate X, Y, and Z in the channel box.
Use the right mouse key over the the channel names, choose Key Selected.
Set Keyframe 80 with the same procedure as keyframe 30, except with the other foot.
When you move the body forward it is OK if the foot rips out, this is the foot that will move forward.
Set Keyframe 100 with the same procedure as 50.
Arms
Select the upper arm joint and use Rotate Z in the channel box to animate the arms swinging.

|