|

Maya Paint Effects
PhotoShop:
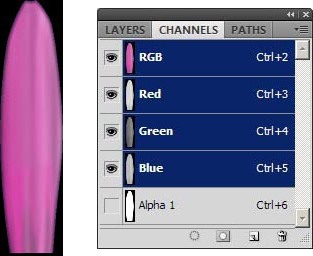
Paint a flower petal with an alpha channel. Save as a TIFF file in your Maya scene directory. Do the same for a leaf. They both should be oriented like this image with a few pixels below in the alpha channel. (This fixes a Paint Effects rendering issue.)

Maya:
Select the Modeling section of Maya, choose from upper left, status line.

Select Generate->Paint Effects Tool
Draw a simple stroke in the Persp View
In the Attribute Editor, select the third tab named brush2
Change Brush Type to Mesh
Under Brush Profile
Brush Width 0
Softness 0
Under Illumination
Check Illuminated
Up Under Mesh
Check Per pixel Lighting
Check End Caps
Under Tubes (Most options are under tubes.)
Check Tubes
Up Under Shading
Change Color 1 to green
Under Tube Shading
Change Color 2 to light green, this is the top of the stem color.
Under Shadow Effects Check Cast Shadows (Will not work for raytrace shadows, only shadow map.
Under Creation (within tubes)
Tubes per step 1 (This number will vary depending on your original curve length.)
Segments 60
Length Max 3
Tube Width 1 .015 (base)
Under Width Scale
Elevation Min 1
Elevation Max 1
Under Growth
Check Branches
Check Leaves
Check Flowers
Check Buds
Under Branches
Split Twist .25
Under Leaves
Leaf bend -.5
Leaf Twirl 1
Uncheck Leaf Use branch Tex
Image Name Select the folder icon to find the leaf you made in Photoshop.
Under Flowers
Petals in Flower 10 (You can always input a higer value than the slider.)
Num Flowers 1
Petal Twirl .1
Make Petal Color 1 and 2 value 1 white
Uncheck Flower use Branch Tex
Image Name Select the folder icon to find the flower you made in Photoshop.
Save your file
Under Behavior
Under Turbulence
Turbulence Type Tree Wind
Play the animation
Render Settings for Maya Software Render
Render Settings 
Under Maya Software Tab
Under Paint Effects Rendering options
Check Oversample
Select a Prefab Brush from Maya
Select Generate->Get Brush...
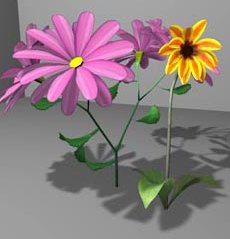
Under FlowersMesh select Tiger.mel
Draw a prefab flower.
To reset the brush: Generate->Reset Template Brush
Use the curve to move the flowers around the scene.
Use Windows->General Editors-> Hypergraph: Hierarchy window to find the curve.
Convert to Polygons for Unity or Arnold
Unity, Mental Ray and Arnold will not render Maya Paint Effects.
Use Modify->Convert->Paint Effects to Polygons->
Select Quad output.
The Paint Effects history still controls the poly flowers, use the history to modify.
Arnold Notes
When rendering with Arnold, you will need to create a new shader for the leaves and the petals to fix the transparency issues.
Check off Opaque under the Arnold drop-down in the Attribute Editor
Use the aiStandard Surface Shader, Hypershade window.
Select the petals
Under Base, click the Map Button  across from Color. across from Color.
Click File and add the petal TIFF file that you used on your Brush
Under Specular, set IOR (Index of Refraction) to 1
Under Transmission set Weight to 0
Under Geometry, click the Map Button  across from Opacity. across from Opacity.
Click File and add a black and white TIFF file, transparent = black.
Follow this same procedure for the Leaf.
Unity Notes
Unity surfaces are single sided by default, items that are seen from both sides such as leaves and flower petals will need to slightly extruded.
Select the petals or leaves
Select Edit Mesh->Extrude
Pull on the blue arrow slightly, or type in a very small number
Check the UV mapping for all polygons
In Unity fix the Transparency Maps
Make a new Material
Change Rendering Mode to Cutout

|