|
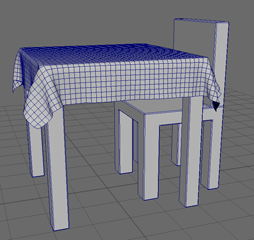
Table
Select the Modeling section of Maya, choose from upper left, status line.

Click the persp view, then hit the spacebar with your mouse over the center of the screen, this is a shortcut to display four views and this displays the Hot Box, if you hit the spacebar again it will display one view, the view the mouse was last over.
Make sure the Select by Object Type button  is selected in the status line near the top. This lets you Select objects, rather than points etc. is selected in the status line near the top. This lets you Select objects, rather than points etc.
Choose Create->Polygon Primitives->Cube A cube will appear at the origin.
Display the Channel Editor
If you do not see the channel box, hit the  button upper right side of the screen, and select Channel Box/Layer Editor from along the right edge. button upper right side of the screen, and select Channel Box/Layer Editor from along the right edge.
Select the Scale Tool button from the side tool box.
Change the size of the cube or use the Channel box on the right side of the screen and input: 
Scale X 4
Scale Y 4
Scale Z 4
Select the cube, use the channel box on the right side of the screen and input:
Translate Y 2
Turn off the preference for the orientation Handle, if you did not do this before.
Select Windows->Setting/Preferences->Preferences
Select the Manipulators section
Uncheck Orientation Handle
This gets in the way of the Pivot Handle. The orientation Handle is good for rotating the pivot center. You will not need this tool very often.
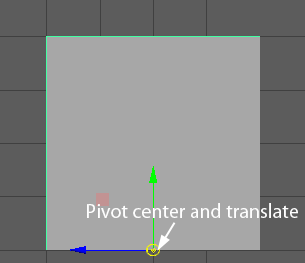
Set the pivot center
Select the Move Tool button from the side tool box. 
Press the d key, this will toggle over to change pivot mode.
While holding down the d and x key for grid snap, (d for pivot) click and drag on the manipulator's green line to move the pivot vertically to the lower edge of the cube.
Booleans
Select the cube, choose Edit->Duplicate Special-> (Open the dialog window.) (Open the dialog window.)
Select Edit->Reset Settings to put the tool back to default, this works on all tool options.
Input Scale 1.5 .9 .8
Translate and Rotate should be 0 0 0
Select the 2nd cube, choose Edit->Duplicate
Look at the Channel box to the right, Rotate 90 in Y
Select the 1st cube, hold Shift and select both of the copied cubes.
Select Mesh->Booleans->Difference (A - B)
You should have a 4 legged table.
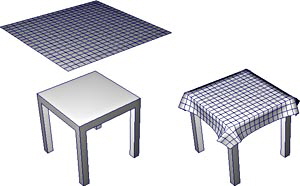
Tablecloth with nCloth dynamics
Make a tablecloth out of a poly plane place above the table.
Create->Polygon Primitive->Plane->
Width and Height 6, 6
Width and Height Divisions 50, 50
Place the cloth about 3 units above the table in the Y Axis.
Switch over to the FX section, choose from upper left, status line.

Select the table
Choose nCloth->Create Passive Collider
Select the tablecloth
Choose nCloth->Create nCloth
Right mouse over the time slider to bring up the mini-menu
select Playback Speed->Play Every Frame, Max Real-time
This insures the calculation is made at every frame.
Play the animation.
Hit the play arrow on the time slider. 
Use the simulation to model
Run you simulation again, stop it when you like the shape of the cloth.
Select the tablecloth
Choose Edit->Duplicate
The copy will not have any dynamics
Move the time slider over to frame 1 at the bottom of the screen.

You can delete the original animated dynamic cloth nucleus, and nRigid1
Unity and nCloth
If you bring any nCloth poly into Unity do this:
File->Save Scene (These next actions are permanent.)
File->Duplicate the nCloth shape, Delete the original
Run File->Optimize Scene Size->
Select Remove: Unknown nodes
Click Optimize
You may want to remove the nucleus1 and the nRigid1 files from the Outliner
Hit this button from the left Toolbox in order to see the outliner. 
Chair
Switch over to the Modeling section of Maya, choose from upper left, status line.

Create a Poly cube for the chair base.
It is easier if you move the poly to .5 in Y,
Set the pivot center at the ground using d and x, then scale.
Cut the legs using Boolean.
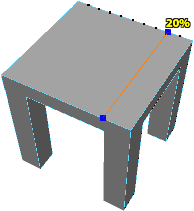
Select the chair base, use Mesh Tools->Multi-Cut to add an edge across the top face.
Hold down Shift, while holding down the left mouse until you see 80%, click one edge.
Hold down Shift, while holding down the left mouse until you see 20% and click the other edge.
Choose the Select manipulator tool over to the left to turn off Multi-Cut. 
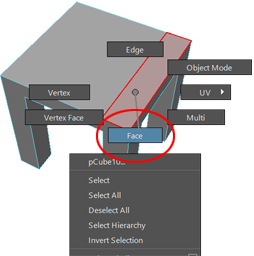
Right mouse over the smaller half of the top surface of the chair.
A Marking Menu will appear, select Face
Click the face to select it, it will turn peach colored.
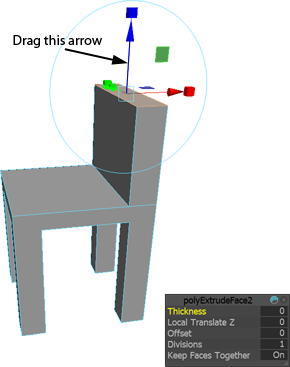
Select Edit Mesh->Extrude
Drag the blue arrow up
Choose the Select manipulator tool over to the left to turn off Extrude. 
Make a render of the scene

|