|
LOOK INTO NESTED DIALECTRICS
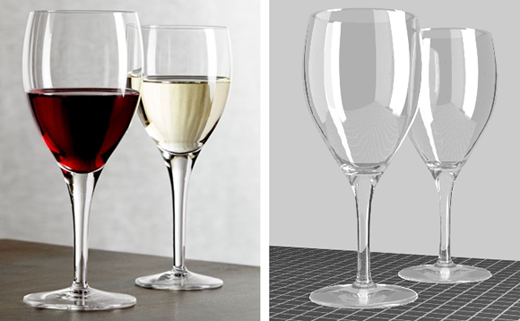
Revolve a wine glass shape, place it on a plane.
Color Management Settings
Select Windows->Settings/Preferences->Preferences
Select Categories Color Management
Under Color Transform Preferences
Change View: to Raw (default ACE 1.0 SDR-video)
Under Rule Priority
Select Default
change Input Color Space: to Utility->Raw (default sRGB)
Click Reapply Rules to Scene button
Under Output Color Transform Preferences
Check  Apply Output Transform to Renderer (important for batch rendering later) Apply Output Transform to Renderer (important for batch rendering later)
Render an image to the Render View
In the persp window
Select View->Camera Settings->Resolution Gate
Uncheck View->Camera Settings->Gate Mask
This will let you see how the image will be cropped.
Click the Render View icon upper right 
Click the Start IPR icon 
Rendering with Arnold
Find a photograph of a glass you like for reference.
 Windows->Rendering Editors->Hypershade Windows->Rendering Editors->Hypershade
In the hypershade window, add a StandardSurface shader
Model a wine glass using Surfaces->Revolve
Select the wine glass.
Pre Maya 2019: Use the Attribute Editor, turn off Opaque under Arnold.
Use the Hypershade window, with the wine glass selected.
Right mouse key over the shader ball, select Assign Material to Selection.
Click the StandardSurface shader ball.
Under Base
Set Weight to 0 (default .8)
Set Metalness to 0 (default 0)
Under Specular
Set Weight to 1
Set Roughness to 0 (default .2, 0 will render faster, add fogginess to the glass)
Set IOR (Index of Refraction) to 1.5, or 1.1 for thin glass (default 1.5)
Set Aristrophy to .5 (default 0)
Under Transmission
Set Weight to 1 (default 0, this makes the shader seem transparent)
Under Geometry
Play with the Opacity color (default white)
Lights
Use Arnold->Lights->Area light
Scale the light tall and thin, following the proportions of the wine glass.
In the Attribute Editor
Set the Exposure to 8
Uncheck Cast Shadows
Uncheck Cast Volumetric Shadows
Add an Arnold->Lights->Skydome light for ambient light
Set the color to 50% grey
Uncheck Cast Shadows and Cast Volumetric shadows
Use a Create->Lights->Point Light
Under Shadows
Change the Shadow Color to 50% gray
Under Arnold
Set the Exposure to 8
Uncheck Cast Volumetric Shadows
*Note: When rendering transparent and refractive surfaces in Arnold, the normals of the geometry need to face in the right direction.
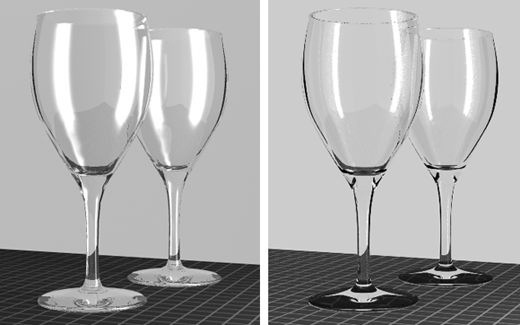
Invisible Shadow Caster
Duplicate your wine glass with Ctrl D
In the Attribute Editor
Make sure the 2nd tab is selected in the Attribute Editor.
Under Render Stats
Uncheck everything except Casts Shadows
Under Arnold->Visibility
Uncheck everything except Casts Shadows
Assign a Lambert Shader
Render Settings Arnold
Press this icon upper middle right 
With these settings below, your scene will render faster with a preview quality.
Under the Arnold Renderer tab:
Under the Sampling arrow:
Set Camera (AA) to 3+ (default 3 removes grain)
Set Diffuse to 2 (default 2)
Set Specular to 1 (default 2)
Set Transmission to 2 (default 2, controls transparency and takes away grain)
Set SSS to 1 (default 2)
Set Volume Indirect to 0 (default 2)
Under the Ray Depth arrow
Set Total to 8 (default 10)
Set Diffuse to 1 (default 1)
Set Specular to 1 (default 1)
Set Transmisssion to 8 (default 8)
Set Volume to 0 (default 0)
Set Transparency Depth to 3 (effects the shadows, default 10)
Click Close to close the window
Count the number of glass surfaces overlapping to determine the Total and Transmission.
Rendering with Maya Software Renderer
 Windows->Rendering Editors->Hypershade Windows->Rendering Editors->Hypershade
In the hypershade window, add a Phong Shader .
Select the wine glass.
Use the Hypershade window, with the wine glass selected, right mouse key over the shader ball, select Assign Material to Selection.
Double click the Phong shader ball to see the attributes..
Adjust Color to 50% grey.
Adjust Transparency, double click on the black color box to bring up the menu.
In HSV mode input .9 as the value (V)
Under Specular Shading:
Input Cosine Power 100
Djust Specular Color to white
Input Reflectivity .1
Under Raytrace Options:
Check Refractions
Input Refractive Index 1.3
Input Refraction Limit 8
Input Reflection Limit 1
Lights
To get highlights, use Create->Lights->Area light with a tall and thin scale, following the proportions of the wine glass.
Under Raytrace Shadow Attributes
Check Use Raytrace Shadows
Increase Shadow Rays to 20 or more only for Area Lights, this gets rid of the noise.
Ray Depth Limit 2
Add Create->Lights->Ambient light for ambient light, place diagonally opposed to the area light.
Set the color to 50% grey
Add a giant sphere for the background.
Press this icon upper middle right 
Change Rendering Using to Maya Software
Under the Common tab:
Under the Image File Output arrow:
Choose Image format: Tiff
Under Maya Software tab:
Under Raytracing Quality
Check Raytracing
Input Reflections 1
Input Refractions 8
Input Shadows 2
Input Bias .2 This will make round objects look less jaggy.
Mental Ray
 Windows->Rendering Editors->Hypershade Windows->Rendering Editors->Hypershade
In the hypershade window, add a mia_material_x_passes1 Mental Ray shader .
Select the wine glass.
Use the Hypershade window, with the wine glass selected, right mouse key over the shader ball, select Assign Material to Selection.
Double click the mia_material_x_passes1 shader ball to see the attributes..
Under Diffuse, adjust Color to 50% gray.
Under Reflection, change Reflectivity to .15
Under Advanced Reflection
uncheck No hightlights for visible area lights
uncheck Skip reflectivity on inside
Adjust Transparency, double click on the black color box to bring up the menu.
In HSV mode input .9 as the value (V)
Lights
To get highlights, use Create->Lights->Mental Ray Physical Area light with a tall and thin scale, following the proportions of the wine glass.
Environment
Select the persp view, select View->Camera Attribute Editor... from the view menu
Under Environment in the Attribute Editor, make the Background Color 50% gray
Render Settings
Press this icon upper middle right 
Change Rendering Using to Mental Ray
Set Overall Quality to 1
Set Lighting Quality to 2.5
Change Indirect Diffuse (GI) Mode to Finalgather
Filter Size 1.000 1.000
Under Trace Depth
Diffuse 2
Glossy/Spec Reflections 2
Glossy/Sec Transmissions 8
Max Trace Depth 8

|

