|
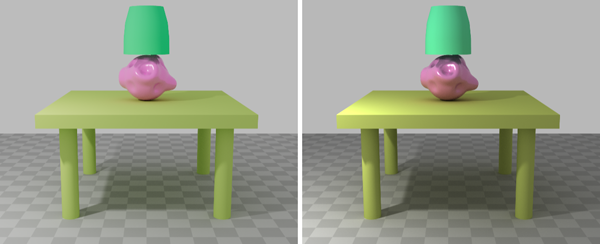
Color Management default Color management RAW
Table Top
Select the Modeling section of Maya, choose from upper left, status line.

Click the persp view, then hit the spacebar with your mouse over the center of the screen, this is a shortcut to display four views. This can also display the Hot Box if you hold the spacebar a bit longer.
If you hit the spacebar again it will display one view, the view the mouse was last over.
Make sure the Select by Object Type button  is selected in the status line near the top. is selected in the status line near the top.
This lets you select objects, rather than points etc.
Choose Create->Polygon Primitives->Cube A cube will appear at the origin.
Select the Move Tool button from the the tool box on the left. Click and drag on the green arrow to move the cube up approximately 4 units in the Y axis. 
Display the Channel Editor
If you do not see the channel box on the right, hit the  button upper right side of the screen, you should see the Channel Box/Layer Editor tab. button upper right side of the screen, you should see the Channel Box/Layer Editor tab.
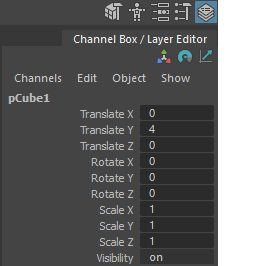
Select the Scale Tool button from the side tool box. Change the size of the cube or use the channel box on the right side of the screen and input: 
Scale X 8
Scale Y .5
Scale Z 8
Legs
Click the front view in order to make the view active, Hit 4 on the keyboard to switch to wireframe instead of shaded.
Choose Create->NURBS Primitives->Cylinder
Select the Move Tool button from the side tool box. Use this to move the cylinder or use the channel box on the right side of the screen and input: 
Translate X -3
Translate Y 3
Translate Z 3
Turn off the preference for the orientation Handle:
Select Windows->Setting/Preferences->Preferences
Select the Manipulators section
Uncheck Orientation handle
This option gets in the way of the Pivot Handle. The orientation Handle is good for rotating the pivot center. You will not need this tool option very often.
Set the pivot center:
Select the cylinder and select the Scale Tool button from the side tool box.
Hold down the d key, this will switch over to change pivot mode. (You can also use the Insert key on the PC or use the Home key on a mac to toggle (not on a laptop)). 
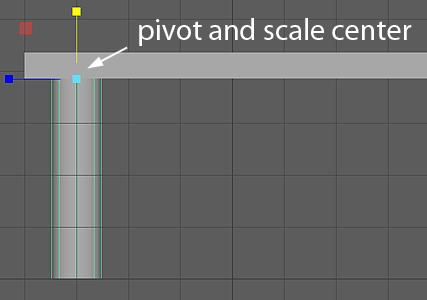
Click and drag on the manipulator's green line to move the pivot up in the Y axis to the upper edge of the cylinder.
Let go of the d key, you will see the scale manipulator is back.
Scale the leg:
Click and drag on the square in the middle of the manipulator icon, this will scale down the entire cylinder in three axes.
Click and drag on the top square on the manipulator icon to scale the cylinder in Y. Notice it is scaling around the pivot point you changed.
Copy the legs: (This will be easier to see in Persp view)
Choose Edit->Duplicate Special-> (Open the dialogue window.) (Open the dialogue window.)
Input translate 6 0 0 (6 units in the X axis, 0 in Y, and 0 in Z.)
Click on Duplicate Special
Select the Select Tool button from the side tool box.
Hold down the shift key and click on both legs. 
Choose Edit->Duplicate Special->
Select translate 0 0 -6 (0 units in the X axis, 0 in Y, and -6 relative in Z.)
Click on Duplicate Special
Moving Around the Window Cameras
PC
Rotate or roll
PC: Alt + the left mouse button roll the persp camera view.
Pan
PC: Alt + the middle mouse button pans any view or panel.
Zoom
PC: Alt + the right button zoom any view or panel. Or just use the middle mouse scroll.
MAC
Rotate or roll
Mac mouse: Option + the left button roll the camera view.
Pan
Mac mouse: Option + the middle mouse button pans any view or panel.
Zoom
Mac mouse: Option + the right button dollys any view or panel
Mac Trackpad preferences
Open Windows->Settings/Preferences->Preferences
Interface section
Uncheck Mouse scroll wheel (The scroll wheel will not work if you have a three button mouse.)
Enable Multi-Touch Gestures
Use Trackpad: Cursor and Multi-touch
Rotate or roll
Mac trackpad: Option + 1 finger, click down
Pan
Mac trackpad: Click the view you want, use 2 fingers to pan.
Include the shift key to constrain horizontal or vertical.
Zoom
Mac track pad: Scissor two fingers lightly in track pad zoom in and out
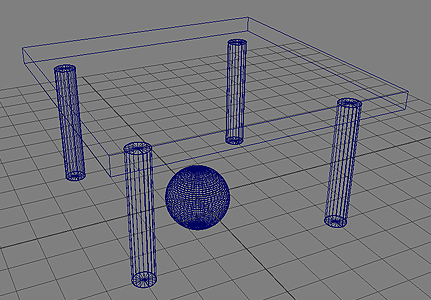
Model a Lamp with Sculpting Tools
These sculpting tools only work on polygons.
Hit 5 on the Keyboard to switch to Shaded from wireframe. (4 displays wireframe)
Dolly and track the front view so there is enough space above the table for the lamp.
Create->Polygon Primitives->Sphere->
Set Axis Divisions and Height Divisions both to 50.
Click on Create
Select the Move Tool button from the side tool box.
Click and drag on the manipulator's top arrow to move the sphere up in the Y axis, on top of the table. 
With the Sphere selected
Mesh Tools->Sculpting Tools ->Sculpt Tool->
Input Size: 0.4
Input Strength: 0.2
Hold left mouse key and drag over the sphere to sculpt.
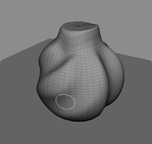
Play with the Sculpt tool to create your own lamp base.
Check Invert under the Sculpt tool to push the points.
To easily access the sculpting tools, Click on theSculpting tab on the shelf.
To open up sculpting tool settings, double click a Sculpting Tool on the Sculpting shelf.
Experiment with other sculpting tools.
Lamp Shade
Hit 4 on the keyboard to switch to wireframe instead of shaded.
Choose Create->NURBS Primitives->Cylinder->
Select Caps: None
Enter Number of sections: 6
Enter Number of spans: 1
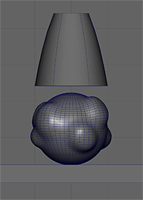
While the lamp shade is active, type f, to frame the front view in on the lamp shade.
Select the component type button  in the status line near the top. in the status line near the top.
The CVs will automatically appear. Component mode lets you pick CVs, rather than objects etc.
CV stands for control vertex, you can drag CVs to change the shape of the lamp shade.
Select the Scale Tool button from the side tool box. 
Select the top row of CVs and scale them. Then scale the next row, etc.
Insert a Floor
Choose Create->Polygon Primitives->Plane
Select the Scale Tool button from the side tool box.
Interactively scale the floor larger. 
Delete Unwanted Objects
Select the object type button  in the status line near the top. in the status line near the top.
Click anywhere in a view where there are no objects. This will turn off all objects.
Click and drag over the object(s) you do not want.
Choose Edit->Delete, or hit the delete or backspace key on the keyboard.
Type z to undo, if you change your mind. (You can setup a lot of undos in Preferences.)
Type Shift z to redo, if you change your mind again.
Add a Light or Two to the Scene
Click anywhere in a view where there are no objects. This will turn off all objects.
While nothing is selected, type f, to zoom each view one at a time around everything in your scene. This will give you more room to position your lights.
Choose Create->Lights->Point Light
Select the Move Tool button from the side tool box.
Click and drag on the manipulator's arrows or center to move the light above the scene. 
Click in the background of the Perspective or camera view to activate that window.
Hit 5 6 then 7 on the keyboard to switch to shaded, texture view with scene lights. 4 will put it back to wireframe.
4 = display active window wireframe
5 = display active window shaded with default lights
6 = display active window shaded and textured with default lights
7 = display active window shaded with first 8 scene lights
Set up your Point Light for Arnold Renderer.
Select the light
Under the Attribute Editor, on the right side of the screen  (Or Ctrl a) (Or Ctrl a)
Click on the Arnold drop down menu
Set Exposure to 8 (You will need to adjust this value depending on the distance.)
Set Samples to 2 (less grainy, default 1)
Click on the  Render View button located at the top of the screen to render a test Render View button located at the top of the screen to render a test
Try changing the Shadow Color for the light.
Add an Arnold Skydome Light
Select Arnold->Lights->Skydome Light
Use this light to add a background color and ambiance.
Keep Intensity 1 and Exposure 0
Set Samples to 2 (less grainy, default 1)
Under Visibility set Camera to 0 if you don't want to see the background sky color in your render.
(This keeps the background and the alpha channel transparent.)
Color
 Click on this Hypershade icon located at the top of the screen. Click on this Hypershade icon located at the top of the screen.
Select the Materials tab (this is the default)

Click on the Standard Surface icon in the Create list 4 times to create 4 shader balls.
Select one or more objects from the scene. (Use object type button near the top  ) )
 In the Hypershade window: In the Hypershade window:
Right mouse key over one of the new shader balls to bring up the marking menu, select Assign Material to Selection.
Double click the shader ball you just assigned.
Click on the box next to the word Color, this brings up the Color Chooser.
Rename the shader if you like.
Assign shaders to everything in your scene.
Render an image to the Arnold Render View
In the persp window
Select View->Camera Settings->Resolution Gate
Uncheck View->Camera Settings->Gate Mask
This will let you see how the image will be cropped.
Click the Render View icon upper right 
Click the Start IPR icon 
Animation
Move the time slider over to frame 1 at the bottom of the screen.

Change 24 fps to 30 fps over to the right on the time slider.

Select the lamp base.
Use the channel box on the right side of the screen. 
If you do not see the channel box, hit the button upper right side of the screen.
Highlight Rotate Y in the Channel Box
Use the right mouse key to bring up mini menu, choose Key Selected over the highlighted channel.
Move the time slider over to frame 150 at the bottom of the screen. (5 seconds)
Rotate the lamp base 360 degrees in the Y axis
Highlight Rotate Y in the Channel Box
Use the right mouse key choose Key Selected over the highlighted channel.
Preview the animation
Move the time slider over to frame 1 at the bottom of the screen.
Right mouse over the time slider to bring up the mini-menu
select Playback Speed->Real-time
Hit the play arrow on the time slider. 
Stop the playback by clicking the mouse on the red square over the play arrow.
Setup a Project Area to work off your external hard drive
The exFAT drive format will work across Mac and PC platforms. You may need to format your drive on a Mac with Disk Utility
Make sure there is nothing you need on the drive. This will wipe out everything.
PC:
Create a project folder on your drive
In Maya
Select File->Project Window
Select New
Type in a name such as ucla156_assignments across from Current Project:
Select the folder icon for Location:
Select My Computer and look for the external drive
Click Accept
A new folder named ucla156_assignments will be placed on the top level of your drive.
Set the Project Location When You Change Computers
Choose File->Set Project...
Select the ucla156_assignments folder
Select Create default workspace
Now your modeling files will be stored in the scenes folder
Mac:
Create a project folder on your drive
Know the name of your external drive, the name should be something easy to remember.
In Maya
Select File->Project Window
Select New
Current Project: type in a name such as ucla156_assignments.
Select the folder icon for Location:
Type /Volumes/name of your external drive across from Location:
Click Accept
Set the Project Location When You Change Computers
Choose File->Set Project...
Select the /Volumes/name of your external drive/ucla156_assignments
you might need to type this path.
Select Create default workspace
Now your modeling files will be stored in the scenes folder
When you save files they will save to your external drive.
Anytime you switch to a new computer run the Set Project utility again.
Store a Copy of Your Model
Choose File->Save Scene As
Type a descriptive name such as tablelamp.
Click the Save button.
A file will be stored in your scenes folder. A scene file contains almost everything:
Objects, Color information, Transformations, Animation, Backgrounds, Hierarchy, Lights, Windows, Dynamics, etc. This is stored in the project you set on your external drive or locally on the hard drive of your computer in a default folder. You may want to back it up somewhere else too.
Read a Stored Model Back On
Choose File->Open Scene
Select the file you want to retrieve.
Render Settings
Press this icon upper right or middle 
Under the Common tab:
Choose Image format: png (The default .exr is 10x larger and 32 bits per channel, the gamma is strange.)
Uncheck Dither
Choose Frame/Animation ext: name.#.ext
Input Start frame: 1
Input End frame: 150
Under the Image Size
choose 960x540
Three times faster test settings, a little grainy, no transparent objects.
Under the Arnold Renderer tab:
Under the Sampling
Set Camera (AA) to 2 (default 3)
Set Diffuse to 1 (default 2
Set Specular to 1 (default 2)
Set Transmission to 0 (default 2)
Set SSS to 0 (default 2)
Set Volume Indirect to 0 (default 2)
Under Filter
Change Width to 1 (less blur, default 2)
Under the Ray Depth
Set Total to 1 (default 10, better ambiance 3)
Set Diffuse to 1 (default 1, better ambiance 3)
Set Specular to 1 (default 1)
Set Transmisssion to 0 (default 8)
Set Volume to 0 (default 0)
Set Transparency Depth to 0 (default 10)
Render an Animation Sequence
Change to the Rendering Module (upper left)

Select Render->Render Sequence from the top menu bar.
You can always hit the Esc button to stop the render.
Where are the files?
The image is stored locally on your computer or in your external drive project in the images folder.
Local PC: C:\Users\%USERNAME%\Documents\maya\projects\default\images
Local Mac: /users/$user/Documents/maya/projects/default/images
View the Animation
Select File->View Sequence... Select the first frame
Change the frame rate to 30fps
If this does not work (I think this is broken)
On a PC: Open Fcheck from C:\Program Files\Autodesk\Maya2023\bin\fcheck.exe
Change the frame rate to 30fps
On a Mac You can use Quicktime or VLC to display an image sequence.

|