|
Add Animation to Objects in Unity
Create a GameObject->3D Object->Cube, or use any object in your scene.
Select the model, Select Window->Animation->Animation (This brings up a timeline.)
Select the Create button, name the animation (This creates an Animator and the Animation Clip with keyframes.)
Select the Add Property button.
Choose Transform->Position + (This adds 2 keyframes)
Open the down arrow  to see the XYZ channels and values, 2 default keyframes, frame 0 and 60 are added. to see the XYZ channels and values, 2 default keyframes, frame 0 and 60 are added.
Change the time on the Timeline
Move the Cube
Click the Add keyframe button

Play the Game to see the animation.
Select Curves at the bottom of the Timeline window to manipulate acceleration between keys.
Right click over a key to bring up the menu, make your selection.
Switch to Curves tab to see the curves
Close the Timeline window when you are through.

Select the object in the Hierarchy if the clip is not added under Animation, connect it. 
:::::::::::::::::::::::::::::::::::::::::::::::::::::::::::::::::::::::::::::::::::::::::::::::::::::::::::::::::::::::::::::::::::::::::
Import Maya Animation Channels (Default Generic Animator)
Save your Maya file with animation into your Assets folder.
Select the Maya file from the Assets folder:
Under Rig leave the Animation Type Generic
Under Animation select Loop Time
Hit Apply
Drag your Maya file into your Hierarchy.
Top menu bar Assets->Create->Animator Controller, name it.
Drag the Animation Controller onto your Maya file in the Hierarchy.
From Assets, double click the Animation Controller, this brings up the Animator window.
From Assets, open the small arrow to reveal the contents of your Maya file in the Project window 
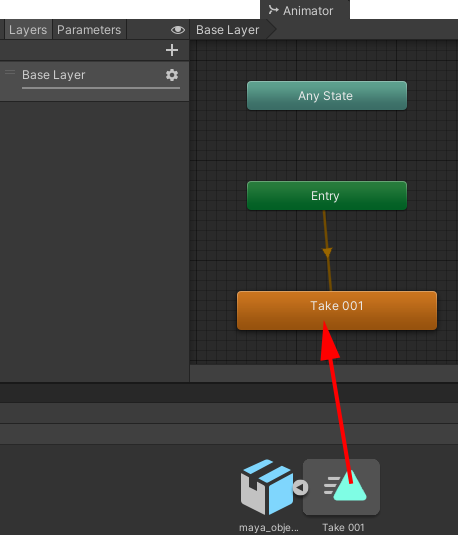
Drag Take 001 into the Animator window

:::::::::::::::::::::::::::::::::::::::::::::::::::::::::::::::::::::::::::::::::::::::::::::::::::::::::::::::::::::::::::::::::::::::::
Legacy Animator with Maya Model
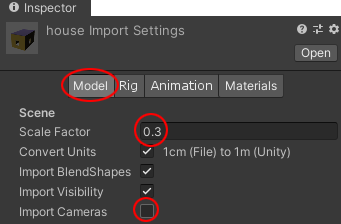
Select the Maya file in the Assets list, select the Model section in the Inspector tab
Change the Scale Factor to .3
Uncheck Import Cameras and Lights
Hit Apply

Switch to Legacy Animation
Select your Maya Model in the Assets area
Switch to the Rig tab in the Inspector on the right.
Change Animation Type to Legacy (default was Generic)
Hit Apply
Loop and Fix channel name
Change to the Animation section of the Inspector tab
Change Wrap Mode to Loop (near top)
Change Wrap Mode located beneath Take 001 to Loop
Change the Clip Name to Take 001 + something descriptive
Hit Apply
:::::::::::::::::::::::::::::::::::::::::::::::::::::::::::::::::::::::::::::::::::::::::::::::::::::::::::::::::::::::::::::::::::::::::
Randomize the time and speed for multiple animations
Written by Alex Rickett UCLA Game Lab
Apply this script to any animated object, Legacy or Default.
Select your object
Select the Add Component button
Scroll down to New script
Type a name: RandomAnimation
Double click the C# script in your Assets folder
using System.Collections;
using System.Collections.Generic;
using UnityEngine;
public class RandomAnimation : MonoBehaviour
{
public float speedRandomizationAmount = .05f;
IEnumerator Start()
{
yield return null;
yield return null;
yield return null;
Animator animator = this.GetComponent<Animator>();
if (animator != null)
{
animator.speed = Random.Range(1 - speedRandomizationAmount, 1 + speedRandomizationAmount);
animator.Play(animator.GetAnimatorTransitionInfo(0).nameHash, 0, Random.Range(0f, 1f));
}
Animation animation = this.GetComponent<Animation>();
if (animation != null)
{
animation[animation.clip.name].speed = Random.Range(1 - speedRandomizationAmount, 1 + speedRandomizationAmount);
animation[animation.clip.name].normalizedTime = Random.Range(0f, 1f);
}
//yield return new WaitForSeconds(0, .2f);
}
}

|