|
Two tutorials: 1 create an animated IK rig and import into Unity; 2 create a rig and interact with it.
Tutorial 1: Simple Animation with Joints
In Maya:
Select Create->Polygon Primitives->Cylinder->
Radius: .05
Height divisions: 10
Cap divisions: 0
Scale the cylinder 4 units to elongate
Create a Skeleton
Switch to the Rigging Module

Hit 4 to switch to Wireframe Shading for the Front View
Select Skeleton->Create Joints
Draw a skeleton over your cylinder in the Front View
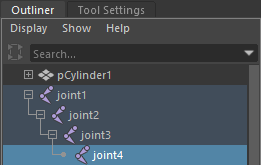
Select the cylinder and the parent of the joints in the Outliner  (Windows->Outliner) (Windows->Outliner)
Select Skin->Bind Skin->
Change Max influences to 3 (default 5)
The weighting will be spread across multiple joints.
You will need to adjust this based on your geometry, keep it low, 5 is too much.

Animate the Rig
Move the time slider over to frame 1 at the bottom of the screen.

Select all the joints
Hold down shift while selecting the  next to joint1 next to joint1
Select all the joints

Highlight Rotate Z in the Channel Box
Use the right mouse key to bring up mini menu, choose Key Selected.
Move the time slider over to frame 120 at the bottom of the screen.
Rotate the joints
Highlight Rotate Z in the Channel Box
Use the right mouse key choose Key Selected.
Hit the play arrow on the time slider. 
In Unity:
Add your Maya File to your scene
Select the Maya file in the Assets list
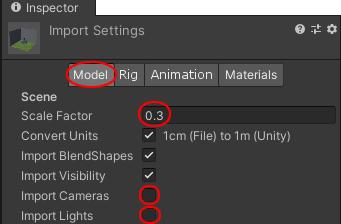
Select the Model tab in the Inspector
Change the Scale Factor to .3
Uncheck Import Cameras and Lights
Hit Apply

Drag your Maya file from the Assets list over to the Hierarchy tab.
Loop the animation
Select your Maya Model in Assets
Switch to the Rig tab in the Inspector
Change Animation Type to Legacy (default was Generic)
Hit Apply
Switch to the Animation tab
Change Wrap Mode to Loop, near the top (default default)
Select Add Loop Frame
Change Wrap Mode to Loop, near the bottom (default default)
Select the Play arrow

Tutorial 2: Interact with Joints
In Maya:
Select Create->Polygon Primitives->Cylinder->
Input Height divisions: 10
Input Cap divisions: 0
Scale the cylinder 4 units to elongate
Select Create->Polygon Primitives->Sphere->
Input Radius: .5
Input Axis divisions: 6
Input Height divisions: 6
Move the Sphere to the end of the cylinder, name it target
Create a Skeleton
Switch to the Rigging Module

Hit 4 to switch to Wireframe Shading for the Front View
Select Skeleton->Create Joints
Draw a skeleton over your cylinder in the Front View with 3 joints
Select only the cylinder and the parent of the joints in the Outliner  (Windows->Outliner) (Windows->Outliner)
Select Skin->Bind Skin->
Change Max influences to 3 (default 5)
The weighting will be spread across multiple joints.
You will need to adjust this based on your geometry, keep it low, 5 is too much.

In Unity:
Import FastIK App
Open the Asset Store
Search for Fast IK (By Daniel Erdmann, it is free.)
Download and Import FastIK into a new project or make a backup of your entire current project.
Add your Maya File to your scene
Select the Maya file in the Assets list
Select the Model tab in the Inspector
Change the Scale Factor to .3
Uncheck Import Cameras and Lights
Hit Apply

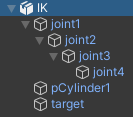
Drag your Maya object from the Assets list over to the Hierarchy tab.
Hold down the Alt key while you select the Maya object in the Hierarchy, this will open all levels.

In Assets
Open FastIK->Scripts->FastIK
In the Hierarchy
Select the last joint
Drag the FastIKFabric script onto the last joint in the Inspector.
In the Inspector, under Fast IK Fabric script for the last joint
Change the Chain Length should to 3, or the number match your skeleton.
Change the Target to your model name.
In the Hierarchy select your target model
In the Inspector
Use Add Component
Add Physics->Sphere Collider.
Search for and add Throwable (This comes with SteamVR)
Under Interactable, uncheck Highlight on Hover
Under Rigidbody, turn off the gravity
If you like turn off Mesh Renderer for the target object in the Inspector.
Select the Play arrow, try dragging the invisible target,

:::::::::::::::::::::::::::::::::::::::::::::::::::::::::::::::::::::::::::::::::::::::::::::::::::::::::::::::::::

|