 |
Texture Maps Arnold and Unity
RAW Color Management Settings
Select Windows->Settings/Preferences->Preferences
Select Categories Color Management
Under Color Transform Preferences
Change View: to Raw (default ACE 1.0 SDR-video)
Under Rule Priority
Select Default
change Input Color Space: to Utility->Raw (default sRGB)
Click Reapply Rules to Scene button
Under Output Color Transform Preferences
Check  Apply Output Transform to Renderer (important for batch rendering later) Apply Output Transform to Renderer (important for batch rendering later)
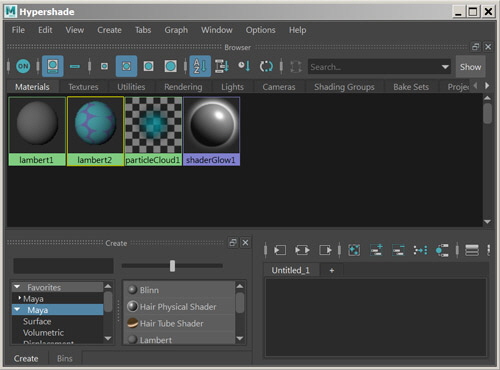
Adjust the Hypershade Window
 Windows->Rendering Editors->Hypershade Windows->Rendering Editors->Hypershade
Close Material Viewer and Property Editor in the Hypershade window
The Property Viewer does not show you all the options listed in the Attribute Editor.
(You can use Window->Material Viewer and Window->Property Editor to bring them back.)
Best Practice for Image Texture Maps
Arnold Renderer
Replace your image file with the converted .tx texture file.
Do not use the legacy shaders with Arnold Renderer, including: Lambert, Blinn and Phong.
StandardSurface should be the main shader you use with Arnold Renderer.
Download this PC script to convert tifs and png files to tx, double click the file from inside the folder where your textures reside.
 (Star = Basic Maps) (Star = Basic Maps)
Color Map Arnold, Maya Software and Unity
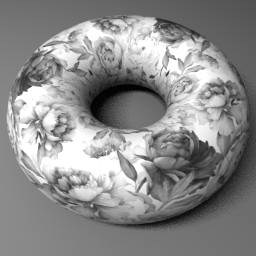 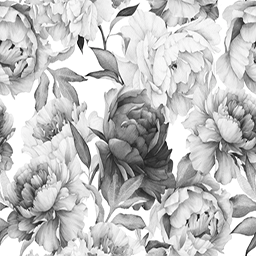
Color mapping is like gift wrapping. Color maps apply an image to the surface of an object
Select a model.
Use the right mouse key over your object to bring up the marking menu
Select Assign Favorite Material->Lambert
Select Lambert for importing to Unity, or select Standard Surface for rendering in Arnold
(You should see the shader in the attribute editor on the right.)
Click the Map Button across from Base or Color 
Select the File icon 
Change Filter Type to Off (less blurry)
Choose an Image Name 
It is best to keep your images in the scenes directory for Maya projects.
It is best to keep a copy of your image in the Assets directory for Unity projects.
Under Arnold Change Filter Type to closest (default smart_bicubic, less blurry)
Hit 6 (shader display) to view the texture shaded on the model.
Metalness Map Arnold and Unity
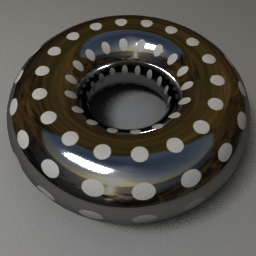 
Metalness mapping determines the reflectivity of an object.
White is mirror, black is no reflection, and gray is inbetween.
This works better with a 24bit image, no alpha channel.
This landscape image is using a 16bit .exr file HDRI image on the Skydome light as a reflection.
Download from Polyhaven.com
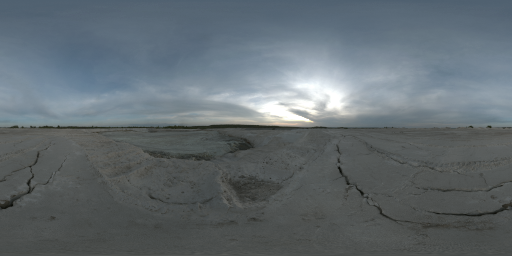
This image was a 16bit HDRI and higher resolution in a previous iteration.
Select a model.
Use the right mouse key over your object to bring up the marking menu
Select Assign New Material
Select Standard Surface for rendering in Arnold. This will not be imported into Unity.
(You should see the shader in the attribute editor on the right.)
Click the Map Button under Base, Metalness 
Select the File icon 
Change Filter Type to Off (less blurry)
Choose an image 
It is best to keep your images in the scenes directory for Maya projects.
It is best to keep a copy of your image in the Assets directory for Unity projects.
Under Color Balance, select Alpha is Luminance
Under Arnold Change Filter Type to closest (default smart_bicubic, less blurry)
Hit 6 (shader display) to view the texture shaded on the model.
Roughness Map Arnold and Unity
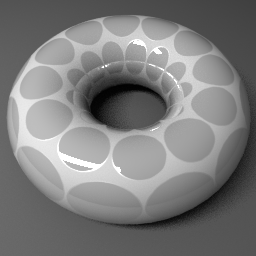 
This works better with a 24bit image, no alpha channel.
Roughness mapping determines the shinyness and dullness of an object.
Black is shiny and white is dull, gray is inbetween.
This image has a little Metalness.
Select a model.
Use the right mouse key over your object to bring up the marking menu
Select Assign New Material...
Select Standard Surface for rendering in Arnold, you will need a new Material in Unity.
In the Hypershade window, double click the new shader ball you just created and assigned.
(You should see the shader in the attribute editor on the right.)
Click the Map Button across from Specular, Roughness 
Select the File icon 
Change Filter Type to Off (less blurry)
Choose an image 
It is best to keep your images in the scenes directory for Maya projects.
It is best to keep a copy of your image in the Assets directory for Unity projects.
Under Color Balance, select Alpha is Luminance
Under Arnold Change Filter Type to closest (default smart_bicubic, less blurry)
Hit 6 (shader display) to view the texture shaded on the model.

Bump and Normal Maps
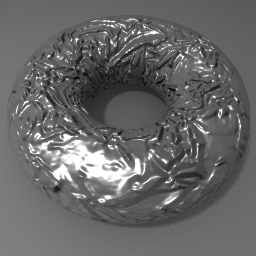 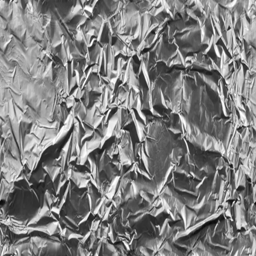 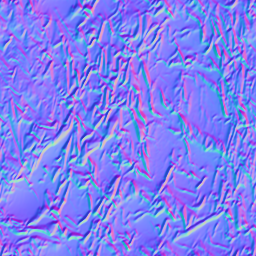
Bump and normal maps are similar to color mapping in approach.
Bright areas of the picture will appear to raise while dark areas will sink in.
The object's surface is not actually distorted, it only appears so. The normal map is purple.
Unity uses normal maps, Unity works best with Lambert shaders.
Maya Software Renderer and Arnold can use either bump or normal maps.
How to create a Normal Map
In Photoshop
Open an image file.
Select Filter->3D->Generate Normal Map... (Ignore message.)
Save the file as a new name into your Unity Assets folder.
Normal Maps Maya Legacy Shaders, Maya Software Renderer, Arnold and Unity
Assign and double click a Maya Lambert shader ball. Use Lambert for Arnold and Unity.
Click the Map Button across from Bump Mapping 
Select the File icon 
New tabs called bump2D and file will appear in the Attribute Editor.
Bump Depth will change the apparent height of the bump, you may use negative values.
Change Use As: to Tangent Space Normals (default Bump)
Go to file tab in the Attribute Editor.
To the right of the Image Name click the folder icon. 
Choose a normal map image.
Under Color Balance, select Alpha is Luminance
Find the Bump Depth Settings later
Right mouse over the word Bump Mapping in the Attribute editor, select bump2d.outNormal...
Change the Bump Depth
Another Method
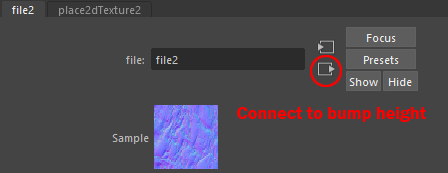
You can always find bump2D tab by clicking the connection arrows.
Double click your shader
Connect over to the Bump Mapping 
Click the lower connection arrow to bring up the bump2d height tab
Change the Bump Depth
Bump Maps Arnold and Standard Surface Shaders
You must use either an Arnold shader, Standard Surface or Lambert with the Arnold renderer.
Create a Maya StandardSurface shader or an Arnold aiStandardSurface.
In the Attribute Editor under Geometry
Click the Map Button across from Bump Mapping 
Select the File icon 
New tabs called bump2D and file will appear in the Attribute Editor.
Go to file tab in the Attribute Editor.
To the right of the Image Name click the folder icon. 
Choose an image. White areas appear to bump out, black stays the same.
(It can work to use the color map for bump.)
Under Color Balance, select Alpha is Luminance
Under the bump2D tab, change the apparent height of the bump
with the Bump Depth slider, negative or positive numbers work.
Displacement Maps Arnold and Standard Surface Shaders
Displacement maps use an image to move the vertices of an object. This is an approach for Arnold renders. Maya render is similar.

Create a Maya StandardSurface shader or an Arnold aiStandardSurface.
In the Attribute Editor click this connection arrow to bring you to the SG tab.
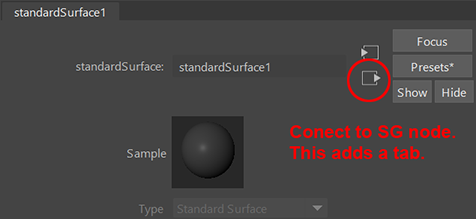
Click the Displacement mat. map button 

Select the File icon  or try a procedure or try a procedure
Go to file tab in the Attribute Editor.
To the right of the Image Name click the folder icon. 
Choose an image. White areas appear to bump out, black stays the same.
The Color Space should be Raw
Under Color Balance, Alpha is Luminance is selected
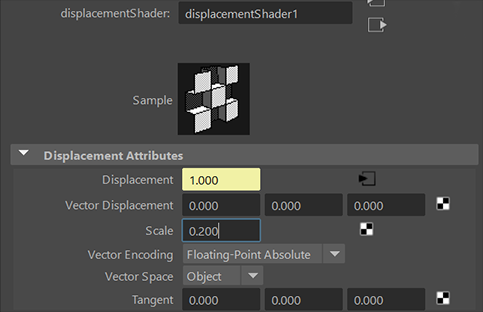
Go back to the displacementShader tab
Change Scale to a smaller value, this will effect the height
(You can always find the Displacement Shader in the Hypershade window.)
Select the object
In the Attribute Editor
Under Arnold->Subdivision
Change Type to catclark (default none)
Increase Iterations as needed (default 1, this will add more geometry + render time.)
(You may use any method to add subdivisions, this method works with the Arnold Renderer.)
Transparency Maps
Transparency maps use black and white luminance data from a color image or the alpha channel.
Luminance values are used to define transparency on the object surface.
Typically, light areas of the picture are more opaque while dark areas are transparent.
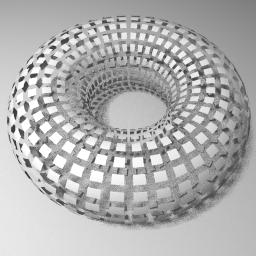 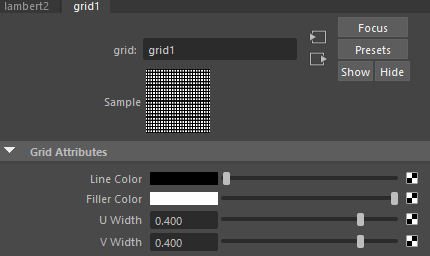
Maya Grid procedure Arnold and Maya Software Renderer
Double click a shader ball
Lambert, aiStandardSurface, or Standard Surface shaders work with Arnold.
(Phong and Blinn do not work with procedural textures and transparency with Arnold)
Click the Map Button  across from Transparency or Geometry Opacity across from Transparency or Geometry Opacity
Click Grid

Unity / Maya Lambert Photoshop 1 Color / Alpha Transparency Map
Maya Shader, Maya Software Renderer and Unity
Use PNG files for transparency maps, TIFs don't always work anymore.
Create an image with 1 alpha channel layer, save as PNG.
The alpha channel will automatically create a transparency map when you apply the image as a color map.
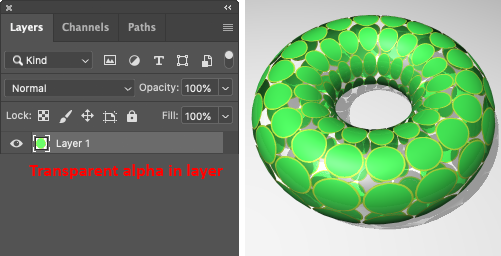 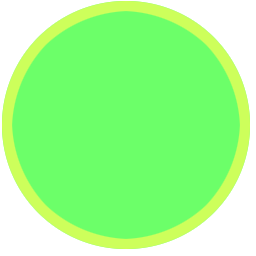
In Photoshop:
Make a 256x256 image with transparency in the Alpha channel layer.
Save the file into your Unity Assets folder as a PNG and or your Maya scenes folder too.
Double click a Maya shader ball. Lambert, Phong, or Blinn
Click the Map Button across from Color 
Select the File icon 
Change Filter Type to Off (less blurry)
Image Name, select your tiff file that has an alpha channel
A transparency map should be automatically generated along with the color map. (If not, the file needs sRGB embedded.)
Under Arnold Change Filter Type to closest (default smart_bicubic, less blurry)
Some settings to take care of shadow Maya render issues with transparency maps:
Maya Shader:
Translucence depth 0 (default .5)
Raytrace Options->Shadow Attenuation 0 (default .5)

Incandescence Maps Maya Software and Unity
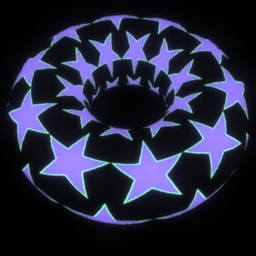 
Incandescence maps are used when a model does not require lighting.
For example, an LED light, a display.
Select a model.
Use the right mouse key over your object to bring up the marking menu
Select Assign New Material...
Select Lambert for Maya Software and Unity
In the Hypershade window, double click the new shader ball you just created and assigned.
(You should see the shader in the attribute editor on the right.)
Change the Color to black, so it does not interfere with incandescence.
Click the Map Button across from Incandescence 
Select the File icon 
Change Filter Type to Off (less blurry)
Choose an image 
It is best to keep your images in the scenes directory for Maya projects.
It is best to keep a copy of your image in the Assets directory for Unity projects.
(Unity bug: incandescence texture repeats in the Maya shader are ignored in Unity.)
Another method to apply an incandescence map in Unity, apply the Emission Color.
You can create an Emission Map for Arnold Shaders and Render.
.

If PhotoShop files will not save
while you are running Maya
Use Arnold->Flush Caches->Textures
Code for script editor: cmdArnoldFlushTexture;
Delete a Shader
 Windows->Rendering Editors->Hypershade Windows->Rendering Editors->Hypershade
In the Hypershade window, select the shader ball.
Choose Edit->Delete in the Hypershade menu. This will not delete any textures associated with it.
Remove Texture from Material
 Windows->Rendering Editors->Hypershade Windows->Rendering Editors->Hypershade
Double click a shader ball.
With the right mouse button, in the Attribute Editor, click on the attribute next to the item mapped, such as Color.
Choose Break Connection
Delete a Texture
Switch to the Textures tab in the Hypershade window
Select the texture you would like to delete
Choose Edit->Delete in the Hypershade menu.
Generate a Map with Render
Create a model, render it to a picture file and use it as a map.
Under the Persp Window menu:
Select View->Camera Settings->Resolution Gate.
Open Windows->Rendering Editors->Render Settings... 
Under Common tab,
Under File Output, Set Image format to Tiff
Under Image Size, Input 256 x 256 width x height

Convert a Procedural Map in Maya
to work in Unity as an image.
In Maya:
Apply a procedural texture to the color such as checker.
Click the Map Button  across from Color, select checker across from Color, select checker
Select your model, use shift to choose your shader too.
In the Hypershade, select Edit->Convert File to texture->
Change the resolution if you prefer, better to keep it low for Unity.
Choose File Format: Tiff (tif)
Convert and Close
This created a new shader and a new color map in the sourceimages directory of your Maya project.
Move the file to your Unity Assets directory, reassign the new location in Maya.
Save your Maya scene file into your Unity Assets folder.
Convert Maya Shaders to Arnold
 Windows->Rendering Editors->Hypershade Windows->Rendering Editors->Hypershade
Select the Shaders you would like to convert
Arnold Shaders->Convert Shaders to Arnold
Choose Selected
You may want to rename the shaders
The converted Phong and Blinn shaders will not look exactly the same, try these settings:
Base
Metalness .2 (reflectivity)
Specular
Roughness .1
IOR 1.5
Coat
Weight .5 (reflectivity and specular)
Color black
Roughness 0
Custom Shader Conversion Scripts
Convert Old School Shaders to Standard Surface
Convert Standard Surface to Old School
Hypershade Graph
 Windows->Rendering Editors->Hypershade Windows->Rendering Editors->Hypershade
Select a Shader
Graph->Input and Output Connections

Lambert Shader with a single texture map with an alpha channel linked for transparency, Maya Software Render, TIF
Color and Opacity map with 1 texture file that has an alpha Channel, Arnold Shader

Use the right mouse key over your object to bring up the marking menu, select Assign Favorite Material->Standard Surface
Click the Map Buttonacross from Base Color 
Select the File icon 
Change Filter Type to Off (less blurry)
Choose an image 
Select the Shader
Graph->Input and Output Connections
Select the + next to Opacity
Drag Opacity R up to Out Alpha
Drag Opacity G up to Out Alpha
Drag Opacity B up to Out Alpha
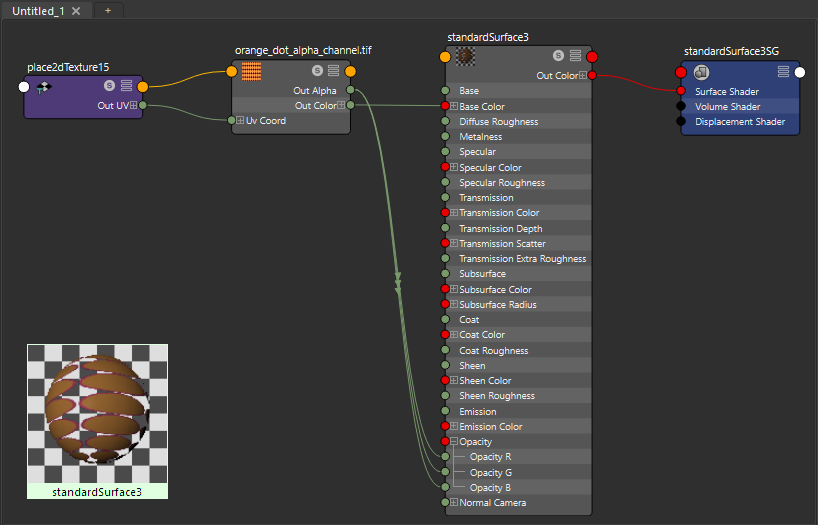
Standard Surface Shader with a single texture map with an alpha channel linked for transparency, Arnold Renderer, TIF
MEL Create a Standard Surface shader w/ transparency alpha
Mel script to create a StandardSurface shader using a file color map. This sets up a connection to opacity to an alpha channel in the color map.
Run the Script Editor
Open the Windows->General Editors->Script Editor... or hit the {;} icon in the lower right.
Paste this script in the lower MEL area
Use Command->Execute from the editor to create a new shader with a texture file node connected to color and opacity.
//StandardShader with connected Transparency map
string $sel="ss";
if(`objExists ($sel+"_standard")`) {rename ($sel+"_standard") ($sel+"_standard"+"x");};
if(`objExists ($sel+"_c")`) {rename ($sel+"_c") ($sel+"_c"+"x");};
if(`objExists ($sel+"_place2dTexture")`) {rename ($sel+"_place2dTexture") ($sel+"_place2dTexture"+"x");};
shadingNode -n ($sel+"_standard") -asShader standardSurface;
shadingNode -n ($sel+"_c") -asTexture -isColorManaged file;
shadingNode -n ($sel+"_place2dTexture") -asUtility place2dTexture;
connectAttr -f ($sel+"_place2dTexture"+".coverage") ($sel+"_c"+".coverage");
connectAttr -f ($sel+"_place2dTexture"+".translateFrame") ($sel+"_c"+".translateFrame");
connectAttr -f ($sel+"_place2dTexture"+".rotateFrame") ($sel+"_c"+".rotateFrame");
connectAttr -f ($sel+"_place2dTexture"+".mirrorU") ($sel+"_c"+".mirrorU");
connectAttr -f ($sel+"_place2dTexture"+".mirrorV") ($sel+"_c"+".mirrorV");
connectAttr -f ($sel+"_place2dTexture"+".stagger") ($sel+"_c"+".stagger");
connectAttr -f ($sel+"_place2dTexture"+".wrapU") ($sel+"_c"+".wrapU");
connectAttr -f ($sel+"_place2dTexture"+".wrapV") ($sel+"_c"+".wrapV");
connectAttr -f ($sel+"_place2dTexture"+".repeatUV") ($sel+"_c"+".repeatUV");
connectAttr -f ($sel+"_place2dTexture"+".offset") ($sel+"_c"+".offset");
connectAttr -f ($sel+"_place2dTexture"+".rotateUV") ($sel+"_c"+".rotateUV");
connectAttr -f ($sel+"_place2dTexture"+".noiseUV") ($sel+"_c"+".noiseUV");
connectAttr -f ($sel+"_place2dTexture"+".vertexUvOne") ($sel+"_c"+".vertexUvOne");
connectAttr -f ($sel+"_place2dTexture"+".vertexUvTwo") ($sel+"_c"+".vertexUvTwo");
connectAttr -f ($sel+"_place2dTexture"+".vertexUvThree") ($sel+"_c"+".vertexUvThree");
connectAttr -f ($sel+"_place2dTexture"+".vertexCameraOne") ($sel+"_c"+".vertexCameraOne");
connectAttr ($sel+"_place2dTexture"+".outUV") ($sel+"_c"+".uv");
connectAttr ($sel+"_place2dTexture"+".outUvFilterSize")($sel+"_c"+".uvFilterSize");
defaultNavigation -ce -source ($sel+"_c") -destination ($sel+"_standard"+".baseColor");
connectAttr -f ($sel+"_c"+".outAlpha") ($sel+"_standard"+".opacityR");
connectAttr -f ($sel+"_c"+".outAlpha") ($sel+"_standard"+".opacityG");
connectAttr -f ($sel+"_c"+".outAlpha") ($sel+"_standard"+".opacityB");
setAttr ($sel+"_c"+".filterType") 0;
Arnold aiJitterColor
Apply random appearing colors across many objects with one shader
Select 5 models.
Use the right mouse key over your objects to bring up the marking menu, select Assign Favorite Material
select Standard Surface
 Windows->Rendering Editors->Hypershade Windows->Rendering Editors->Hypershade
Click the Map Button across from Base, Color 
Select Arnold, Utility, aiColorJitter
Change Type to Object
Change the Color
Change Hue Max to a value under 1
Change Saturation Max to a value under 1
Projection Utility
Project any texture onto an attribute.
Open the Hypershade
Create a Shader
Click the Map Button for an attribute 
Select Utilities
Select Projection
Hit the Interactive Placement button
Select Create a Placement Node
Click the Map Button for Image attribute 
(Try various projections, move the placement icon around, select it in the Outliner.)
If it does not ask to create a placment node, do this:
In the Script Editor, run this command to create a placement icon
AEinvokeProj projection1
Compare Software
|
Arnold Render with
|
Lambert/Phong/Blinn
|
Maya StandardSurface
|
aiStandardSurface
|
|
|
color map
|
yes, not so good
|
yes
|
yes
|
|
|
color procedural map
|
yes, not so good
|
yes
|
yes
|
|
|
|
|
|
|
|
|
bump or normal map
|
yes Lambert, no Blinn, Phong
|
yes
|
yes
|
|
|
bump procedural map
|
yes Lambert, no Blinn, Phong
|
yes
|
yes
|
|
|
|
|
|
|
|
|
transparency map
|
with a bw map
|
yes
|
yes
|
|
|
trans. procedual map
|
yes
|
yes
|
yes
|
|
|
|
|
|
|
|
|
reflected color map
|
no
|
no
|
no
|
|
|
refl. Procedural map
|
no
|
no
|
no
|
|
|
|
|
|
|
|
|
Arnold Issues
|
|
|
|
|
|
No swatches in Hypershade PC
|
|
|
|
|
|
Many shaders do not preview with GPU Renderer
|
|
|
|
|
Point lights do not work so well inside a room, lots of grain
|
|
|
|
|
Arnold Shaders do not list in the Channel Box
|
|
|
|
|
Tif files with alpha channels connected to opacity are negative, need to connect with graph edito in hypergraph
|
|
|
Can use graph editor to connect alpha channel
|
|
|
|
|
Layered Shader does not interact with Maya StandardSurface or aiStandardSurface shaders
|
|
|
|
|
|
|
|
|
|
|
|
|
|
|
Unity GPU
|
Lambert/Phong/Blinn
|
Maya StandardSurface
|
aiStandardSurface
|
Unity material
|
|
color map
|
yes
|
no
|
no
|
albedo
|
|
color procedural map
|
yes
|
no
|
no
|
can script a Shader
|
|
|
|
|
|
|
|
normal map
|
yes
|
|
|
yes
|
|
bump map
|
yes changes to purple normal
|
no
|
no
|
yes purple
|
|
bump procedural map
|
no
|
no
|
no
|
Can script a Unity Shader
|
|
|
|
|
|
|
|
transparency map
|
yes if alpha in color map
|
no
|
no
|
yes if alpha in color map
|
|
trans. procedual map
|
no
|
no
|
no
|
Can script a Unity Shader
|
|
|
|
|
|
|
|
reflected color map
|
no
|
no
|
no
|
Reflection Probe
|
|
refl. Procedural map
|
no
|
no
|
no
|
Script
|
|
|
|
|
|
|
|
Note: For best results, use Maya Lambert or a Unity Material with Unity. Use Photoshop to make Normal maps.
|
|
|
|
|
|
|
|
|
|
|
|
|
|
|
|
Maya Software Render
|
Lambert/Phong/Blinn
|
Maya StandardSurface
|
aiStandardSurface
|
|
|
color map
|
yes
|
dim
|
dim
|
|
|
color procedural map
|
yes
|
dim
|
dim
|
|
|
|
|
|
|
|
|
bump or normal map
|
yes
|
yes, color too dark
|
no
|
|
|
bump procedural map
|
yes
|
yes, color too dark
|
no
|
|
|
|
|
|
|
|
|
transparency map
|
alpha channel or bw map
|
yes, color too dark
|
no
|
|
|
trans. procedual map
|
yes
|
yes, color too dark
|
no
|
|
|
|
|
|
|
|
|
reflected color map
|
yes
|
no
|
no
|
|
|
refl. Procedural map
|
yes
|
no
|
no
|
|
|
|
|
|
|
|
|
Note: For best results with Maya Software render use Maya Shaders and lights.
|
|
|
|
|
|
|
|
|
|
|
|
|
|
|
|
Good to know
|
|
|
|
|
|
With Tif the Photoshop layer transparency is ignored for transparency, need an alpha channel.
|
|
|
PNG does not save a separate alpha channel, it uses alpha layers.
|
|
|
|
12/2/2020
|
|
|
|
|

|